Tags/Dispositions in the conversation
Tags/Dispositions can be defined as a way in which something is placed or arranged. In this context, dispositions will allow you to classify your contacts according to your preference. For example, you can use dispositions to classify your contacts as a ‘new contact’, ‘booked contact’, or ‘not contacted’. This can help you identify the status of the contact and choose your actions accordingly.
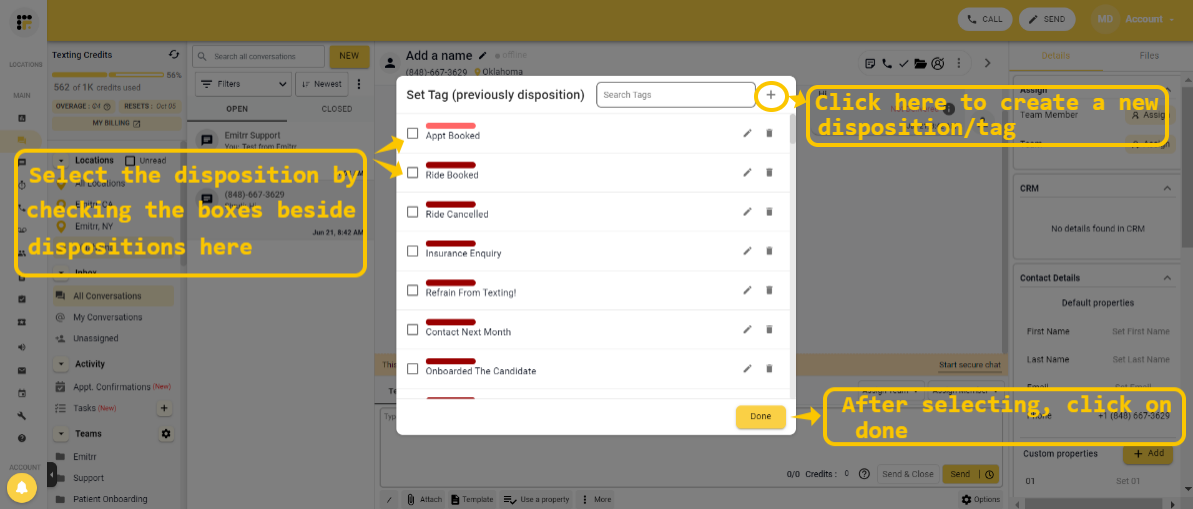
You can find ‘set dispositions’ on the right side of the contact name. (Top right) Tags/Dispositions will allow you to classify the contact according to your set parameters. To set a disposition follow these steps :
- Click on ‘set dispositions’.
- Select the disposition you would want to assign to the contact, you can select multiple dispositions too.
- Click Done.
- If you wish to create a new disposition click on the ‘+’ icon, add the disposition name, and click on save. You can also color code the dispositions.

You can filter the conversations based on the dispositions and can find the number of conversations with the particular disposition under Metrics.
Open and Close conversation
Once you are done with a particular conversation you can click on the ‘✔’ icon which is located on the top right corner of the contact name. This will close the conversation.
To reopen the conversation, from the list of closed conversations click on the ‘↻’ icon.
You will notice that conversations are sectioned in the conversations tab as ‘open’ and ‘closed’. You can access the open and closed conversations from there.
Call
This feature allows you to initiate direct calls to your contacts seamlessly. Let's get started:
1. Accessing the Call Option
- Navigating to Conversations: Start by logging into your Emitrr account and navigating to the Conversations section.
- Selecting a Contact: Choose the contact you wish to call from your conversation list.
2. Initiating a Call
- Locating the Call Option: Once you've selected a contact, look for the call option icon (?) on the right-hand side menu within the conversation interface.
- Activating the Call: Click on the call icon. Emitrr will automatically copy the contact's phone number to your device's keypad.
- Making the Call: Your device will then prompt you to confirm or proceed with the call. Select the appropriate option to initiate the call directly to the contact's phone number.
Opt-out Contact
Managing Opt-Out and Opt-In Contacts Using Emitrr
This feature allows you to respect user preferences regarding receiving text messages. Let's dive into the details:
1. Manual Opt-Out and Opt-In
- Accessing Opt-Out Option: Start by logging into your Emitrr account and navigating to the conversation interface.
- Locating Opt-Out Option: In the right-hand top side menu, look for the Opt-Out contact option.
- Manual Opt-Out: Click on Opt-Out to manually mark a contact as opted-out. This means they will no longer receive text messages from your account.
- Manual Opt-In: If a contact wishes to opt in again, you can manually opt them back in by selecting the Opt-In option in the same menu.
2. Automatic Opt-Out via Keywords
- Keyword Recognition: Emitrr's system automatically recognizes keywords such as "Stop," "Unsubscribe," etc., sent by the contact.
- Opt-Out Process: When a contact sends one of these keywords, they are automatically added to the Opt-Out list, indicating their preference not to receive further text messages.
- No Further Messaging: Contacts on the Opt-Out list will not receive any text messages unless they explicitly opt back in.
3. Opt-In Process via Keywords
- Opt-In Keywords: To opt back in, contacts on the Opt-Out list can send keywords such as "Start," "Subscribe," etc.
- System Recognition: Emitrr's system will recognize these keywords as an indication that the contact wishes to receive text messages again.
- Resuming Messaging: Once opted back in, the contact will start receiving text messages from your Emitrr account as usual.
4. Best Practices
- Respecting Preferences: Always respect the contact's preference regarding receiving text messages.
- Clear Communication: Clearly communicate Opt-Out and Opt-In processes to contacts to ensure they understand how to manage their preferences.
- Compliance: Ensure compliance with applicable laws and regulations regarding SMS communications and opt-out procedures.
The Opt-Out feature in Emitrr empowers you to manage contact preferences effectively, ensuring compliance and respecting user choices regarding receiving text messages. Whether manually opting out/in or using keywords for automated processes, this feature enhances communication transparency and user experience. If you have any questions or need further assistance, feel free to contact our support team.
Block contact
Blocking and Unblocking Contacts in Emitrr
This feature allows you to stop receiving messages from specific contacts, enhancing your control over your messaging experience. Let's get started:
1. Blocking a Contact
- Accessing Block Contact Option: Start by logging into your Emitrr account.
- Locating Block Contact: In the top right-hand side menu, look for the Block contact option.
- Blocking Process: Click on Block contact to initiate the blocking process.
- Confirmation: Confirm the action to block the contact. Once blocked, you will no longer receive messages from this contact.
- Effectiveness: Blocking a contact ensures that their messages are no longer visible or received in your Emitrr account.
2. Unblocking a Contact
- Accessing Blocked Contacts: If you wish to unblock a contact later, navigate to Contacts > Blocked contacts in your Emitrr dashboard.
- Locating the Contact: In the Blocked Contacts section, locate the contact you want to unblock. You can also search for the name or number of the blocked contact.
- Unblocking Process: Click on the Unblock option next to the contact's name.
- Confirmation: Confirm the action to unblock the contact. Once unlocked, you will be able to receive messages from this contact again.
3. Managing Spam Messages
- Effective Spam Control: Use the Block contact feature to effectively manage and stop spam messages.
- User Control: Enhance your control over who can communicate with you via Emitrr.
- Improved Messaging Experience: Block unwanted contacts to maintain a clutter-free and relevant messaging experience.
Flag Conversation
This feature allows you to add flags to conversations with optional comments or reasons, providing enhanced organization and context to your communications. Let's dive in:
1. Adding a Flag to a Conversation
- Accessing Flag Option: Start by logging into your Emitrr account.
- Locating Flag Option: In the conversation view, locate the Flag option. This is usually found in the top right-hand corner or under a More or Options menu.
- Adding a Flag: Click on Flag to add a flag to the conversation.
- Adding Comments or Reasons: Optionally, you can add comments or reasons for flagging the conversation. This provides additional context for yourself or your team members.
- Saving the Flag: Once you've added the flag and any comments, save or apply the flag to the conversation.
2. Viewing Flags
- Hovering Over Flag: After adding a flag, hover over the flag icon in the conversation view.
- Displaying Comments/Reasons: The value displayed upon hovering over the flag will reflect the comments or reasons you entered at the time of flagging. This helps in quickly understanding why the conversation was flagged.
- Default Value: If no comments or reasons were provided, the default value "flagged" will be displayed upon hovering.

